June 5-6, 2010
Facts:
Pico de Loro stands 664 meters / 2178 feet.
Pico de Loro is the highest mountain and highest point within Cavite and Batangas.
Best months for climbing: April/May
We reached the jump off point after lunch and went straight to DENR to register and pay some fees before proceeding. (They have comfort rooms with water supply. Yehey!)
The start of the trek was pretty easy. But the rain made the track muddy and slippery.
This was my 2nd outdoor adventure with the group. (My first was the rappelling at Balumbong Railway Bridge.)
This was my 2nd outdoor adventure with the group. (My first was the rappelling at Balumbong Railway Bridge.)
And I am really excited to reach the summit!!!
We were happy to have reached Base Camp 1.
You will have to pay another fee and register again. (Sorry, I forgot how much the fees were but surely, it should be not more than 100 pesos)
NOTE: You may refill your water bottles here.
Also, this is the last place where you can use a toilet bowl. *teehee*

Indian mangoes were sold for 2 pesos each

Watch out for horse dung along the way
photo by DonDon Lejano
We thought that since forums and other websites claim that this is a beginner's trek, this should be easy. But boy we were wrong!!!
Whoever said that climbing Pico de Loro is for beginners was crazy!!!
The pathway ahead was steep and full of ascents.
The pathway ahead was steep and full of ascents.
The rain also made it worse... again, two words could best describe this trail... MUDDY and SLIPPERY... very muddy and extremely slippery, which made it difficult to traverse

photo by Radz Toledo
Also, signboards in "forks" should be placed to avoid confusion in trails and to prevent this from happening.

A pile of zen stones was a nice treat
photo by DonDon Lejano

remember, pack light to avoid a heavy load on your back
photo by DonDon Lejano
I wish I had hiking boots. USE OF TREKKING SANDALS IS DEFINITELY NOT A GOOD IDEA.
A long hike like this one makes your feet vulnerable to scrapes and wounds.


Poor running shoes...
Since we were beginners. It took us at least 4 hours to reach the main camp site. I know it should only take about 2 hours but the muddy track really was hard to cross.
By the time we reached the camp site, it was already getting dark so we decided to pitch our tents before it gets totally dark. Besides, it was already very foggy so we couldn't see the view anyway.
Main campsite is also known as "Panda Land" because of the lush bamboo trees surrounding the area.

Night at camp was fun since one member of our group brought his guitar.
HAPPY HOUR!!!!

photo by DonDon Lejano
Morning came and after everyone ate their breakfast, we finally started our assault to the summit.
It was about 30 minutes to 1 hour climb. It was steeper and scarier than our climb to the main campsite.

photo by Lala Vargas
Grasses are the only thing to hang on to for dear life. Good thing we didn't bring anything except our cameras.

photo by DonDon Lejano

Aco, a mountaineer, said that this is one of the few mountains that has a 360 degrees view from the summit, which made me feel more grateful for being able to reach the summit of Pico de Loro.


I must admit, the view was breathtakingly AWESOME!

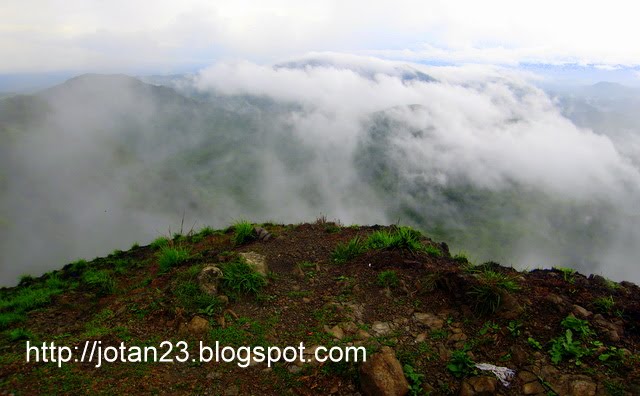
We saw the Pico De Loro Hamilo Coast from the top, with its white sand stretching from the island.
We could've seen a lot more but the fog made it impossible for us to view the whole stretch of the place.

Mists were everywhere!
photo by Radz Toledo
Aco and the rest of the team braved the Pico de Loro Beak.
I wish I did too but I was not sure if I'm ready so I decided to stay behind and just wait for them to reach the peak of the beak.


photo by Lala Vargas
While on the summit waiting for the team, we were swarmed with different kinds of bugs - a lot of which I saw just then. Some bit me, some didn't.


It was pouring when they finally reached the top and that made me worry more for them because the wind was just crazy! One of them almost slid off the edge of the rock; fortunately, no one was harmed except for some minor scrapes.

All the while, I thought it was a vertical climb.
If I only knew that it wouldn't be that hard, I would've TRIED at least :)
Oh well, maybe next time!

photo by Radz Toledo

photo by Radz Toledo

photo by DonDon Lejano

photo by DonDon Lejano

photo by DonDon Lejano

"The Beak"

Pico de Loro Summit
photo by DonDon Lejano
The trek back was another challenge for us because of the heavy rain while we were on the summit.


photo by Lala Vargas
The soil was loose and the ground was very slippery.
Beginners like us just kept on hanging on to whatever we can hold on to.
It was still raining when we reached the campsite and we had to pack up fast so we can have our late lunch at base camp 1.

photo by DonDon Lejano
DETOUR: Pico de Loro Waterfalls. It was not much but it was a refreshing stop from the long trek :)
Another 1 hour trek from the falls brought us back to base camp 1. Here, we got to enjoy our super late lunch. This was a very much anticipated break for us to use the restroom, refill our water bottles, eat and brush our teeth.

We thought the weather was turning out great already when all of a sudden, it rained cats and dogs again!!! phew!
We were so happy when we finally reached the DENR site to wash up and change clothes.
Also, the rented van was already waiting for us to take us to the jump off. From the jump off, we took the bus going to Buendia.
NOTE: Be very mindful of your things when reaching Buendia (Roxas Boulevard) especially if it's already dark because there are PLENTY of robbers in that place. We were almost robbed without us knowing, but luckily, a taxi driver was alert and informed us about it.
How to get to Pico de Loro:
1. Take SAULOG Bus going to TERNATE, CAVITE. Please be advised that they no longer stay in Lawton. Passengers should now go to BUENDIA near LIBERTAD or DFA.
2. Upon reaching Cavite jump off point, hire a VAN or JEEP to take you to the DENR rest area to pay certain fees and to register. NOTE: This is also where you can take a shower after the climb and charge your cellphones (for a fee). You can also ask the driver for his cellphone number so that he can take you back to the bus terminal when you are ready to go back.
ADDITIONAL TIPS:
1. Use a TREKKING POLE.
2. Use hiking boots or any hiking closed shoes.
3. Bring wet tissue because you won't have any water supply at the campsite after base camp 1.
4. Bring a windbreaker, preferably waterproof. (during rainy season and Ber months)
5. Aside from a headlamp, an LED flashlight is also useful (for the campsite).
6. Leggings for girls and pants for boys is advisable.
7. Bring slippers for you to use at the campsite.
8. Make sure you have enough water supply.
9. Use a backpack.
10. Put all your things in a big plastic bag before putting it in your back pack. This will protect your things from being wet.
11. Leave your things at the campsite when going to the summit.
12. Put your cameras in a plastic container or ziplock bag to prevent moisture.
13. Refrain from sitting at once from a long hike to prevent blood flow from rushing to your brains. Rest while standing for a minute or so before sitting down.
14. Pack light!
15. Bring an insect repellent.
15. Bring an insect repellent.
16. PACK UP YOUR TRASH!!! PLEASE........Do not leave any trash at the campsite.
17. "LEAVE NOTHING BUT FOOTPRINTS. TAKE NOTHING BUT PICTURES. KILL NOTHING BUT TIME."